

Believe it or not, we are surrounded by all kinds of documentation in our everyday lives. You pull a new recipe from a cookbook or your favorite website—that recipe is a form of documentation that steps through how to make your dinner. You leave your children with your parents for a weekend away—well, if you are anything like me, you are providing step-by-step instructions on wake-up times, meal options, activity schedules, and bedtime routines. All of these examples are types of documentation.
Why is documentation so important? Well, for two reasons. First, following documentation saves you or your user time—whether that’s time spent trying to guess which spices would taste good in your recipe or time spent trying to figure out what the grandchildren will eat for dinner. Secondly, the quality of documentation directly correlates to the quality of your end product. If you follow the recipe, you’ll have a dinner that everyone enjoys. If you provide good instructions to your parents for watching your children, they will come home happy, well-rested, and not buzzing from an overload of sugar…well, you can hope.
These premises also apply to creating client documentation. You create documentation first, to save time. Documenting workflows and procedures reduces, or potentially eliminates, time spent by your staff trying to puzzle their way through HOW to do something. The documentation provides them step-by-step instructions they can follow without your having to provide the same direct, one-on-one training multiple times. As such, your staff will become much more efficient with their time, increasing their daily productivity, leading to overall increased levels of satisfaction. In addition, creating proper documentation will save YOU time—time you would have had to spend providing direct training. Not only does documentation save you upfront training time, but it also serves as a resource moving forward. Your staff won’t need to come to you with every little question they have. Now, don’t be mistaken: creating documentation will not completely eliminate all training and instruction. But being able to direct your staff to review a piece of documentation as a first step will allow them to work independently while also being able to come to you with targeted, specific questions about the task.
Also, proper documentation ensures the quality of your end product. An accountant cannot process internal payroll without knowing how to take the proper deductions. A content producer cannot author a chapter of test bank questions without knowing what kinds of questions are acceptable, how many of each, and basic metadata requirements. If proper documentation is consulted as part of the workflow, and that documentation is accurate and thorough, then it stands to reason that your final deliverable—whether that be an actual product or the completion of a workflow—will be accurate, thorough, and of the utmost quality.
But how do you create “proper” documentation? How do you ensure that your documentation is accurate and thorough? What makes one kind of documentation more effective than another? How will you ultimately know if your documentation is “good”?
Below, I have outlined some do’s and don’ts for creating proper documentation (And yes, I realize I am creating documentation on how to create documentation—the irony is not lost on me!).
DO: Know Your Audience
To start, it is crucial to know your audience. Who will be reading and following your documentation? What background or context will they already have before reading your documentation, and how much do you need to supply as part of it? If you supply too much background or context, they may miss the “meat” of what you are hoping your documentation will achieve—that is, if they ever arrive at the “meat” of your document in the first place. If you provide too little background or context, you will be “rewarded” with 652 emails with requests to provide further clarification. So, think ahead. If you can figure out what your audience does and does not know, it will help determine how much extra detail to provide.
DO: Know Your Purpose—It Will Inform Format
What is the purpose of your documentation? Are you providing step-by-step instructions on how to perform a particular task? Are you providing a sort of checklist for someone to follow when reviewing a deliverable for accuracy and completeness? Or are you creating an org chart or decision tree? Knowing the end goal of your documentation will inform how it should be structured. For example, if you provide step-by-step instructions on how to perform a specific task, would you discuss each step in paragraph form? Probably not. A numbered or bulleted list would probably be more effective. Similarly, an org chart or a decision tree would be best communicated in the form of a process diagram or chart.
DON’T: Create Documentation That Is Multipage Pages of Straight Text
Have you ever read through a piece of documentation that is pages and pages (and pages and pages…) of straight, dense text? I know I have. How effective was that documentation in instructing you how to do something? In my experience, I spend about 10 minutes reading and re-reading the first sentence, committing it to memory… then my eyes glaze over, lose focus, and can’t remember anything I have read. When creating documentation, keep the following steps in mind:
- Choose a format suitable for the type of documentation you are trying to create. Use numbered or bulleted lists for instructions, diagrams or charts for org charts or decision trees, and so on.
- Apply styles. Use boldface, italics, highlighting to emphasize items of importance.
- Avoid creating documentation that contains paragraphs of dense text. That goes without saying.
- If your documentation DOES need to contain long paragraphs of text to provide necessary background or context, consider instituting a heading structure. Documentation will be easier to navigate if your reader can scan the heads to find the passage relevant to the work they are performing.
- Better yet, consider creating a table of contents (ideally with live links to the relevant document sections) that helps the user navigate the document as a whole.
- Be concise. This can be difficult for some (and me personally). It is great to document everything but remember your audience. Your content should be chunkable and easily digestible.
DO: Include Visuals
I am partial to including visuals in any documentation I create. Visuals are effective in that they 1) break up dense pages of content, and 2) give users the ability to follow along visually with the process you are articulating. However, visuals shouldn’t be inserted into documentation willy-nilly; they should serve a purpose—to reinforce something you are trying to explain. Here are a couple of tips when using visuals in your documentation:
- Consider annotating your visuals: Imagine a user is reading your document and comes across a visual. They wonder to themselves, “What purpose does this visual serve? What am I supposed to be learning here?” As part of creating proper documentation, you want to make sure your visuals reinforce what you are trying to teach. Instead of simply inserting a screenshot, consider making that screenshot into a PDF and annotating it to draw attention to the point you are trying to convey as part of the visual.
- Please don’t go overboard: Visuals can be used to reinforce your ideas, but you don’t want to use so many that the document itself feels clogged with them. If you create step-by-step instructions with visuals, consider combining two steps into one, using only one visual, and labeling the visual appropriately with the relevant steps.
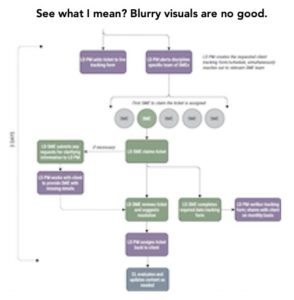
- Make sure your visuals are crisp and clear: This goes without saying, but if you take screenshots, make sure they are crisp and not blurry. A blurry visual detracts from the overall quality of your documentation.
DO: Include Links…Carefully
Links are effective in documentation because they provide instant access to relevant sites your users may need to access. That being said, make sure they are actually linked correctly! There is nothing more frustrating than having to copy/paste a link out of a Word document into your browser. All in all, links are a great addition to any piece of documentation—but be warned. You will need to review your documentation regularly to update and/or replace any dead links. Links are useless if they don’t access a live site.
DON’T: Limit Yourself to Microsoft Word
While the examples I have provided so far have been focused on documentation created in Microsoft Word, you don’t have to confine yourself to creating Word documents. PowerPoint is another effective platform in which you can create your documentation. It gives you the liberty to explore a variety of designs, insert visuals, create animations, and the like (and free templates are so easy to find online these days!).
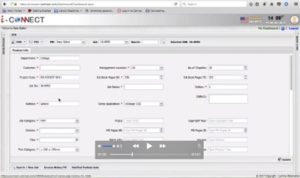
Also, consider creating video tutorials as a type of documentation. Videos are especially great when you are providing step-by-step instructions that detail a specific process or workflow. A tip, however: be mindful of the duration of your video. Your users are not going to want to sit through a 45-minute video to get to one small piece relevant to the work he/she is performing (unless you have created a “minutes TOC” outlining where the user can find the relevant information). For example, the training video below is just over 5 minutes long and discusses only one specific topic. So, in short, keep your videos targeted and concise.
DO: Consider Where You Want Your Documentation Housed
There are two schools of thought here. Some folks send “roll-out” emails attaching their documentation and include a brief summary or description. The pros to this method are that the documentation is instantly delivered to your users’ inboxes, and you aren’t relying on them to locate it from an FTP, Dropbox, or Google Drive. The cons to this method are that in order to locate documentation for future use, you need to search through your emails for it. Depending on how the email is named, this could become like searching for a needle in a haystack.
Another method is to still send a “roll-out” email and to attach the relevant documentation, but also to post that documentation on an FTP site or utilize some other cloud-based storage. Personally, I create a sort of “documentation library.” I create a master folder for my particular client, and within that folder, I create various subfolders that cover a variety of topics. As I create documentation, I upload it to the relevant subfolder and give my users a link. The key benefit of this particular method is that you maintain a centralized repository of information to direct people. The cons to this method are maintenance and upkeep and the possibility that others might monkey around with your library—so make sure that you consider any confidentiality concerns and set your permissions appropriately. Whichever school of thought you subscribe to, be consistent in your approach.
DON’T: Distribute Without Having Solicited Feedback
Although one person may initially draft a piece of documentation, creating proper documentation is a team sport. Before you post your documentation for mass consumption, you should first solicit feedback from key stakeholders, either at your company, the client, or ideally, both. Why, you might ask? Well, you want your test users to:
- Read through your documentation, step through the processes you are trying to outline, and look for errors.
- Point out instructions that don’t make any sense or that don’t actually work when replicated in real life.
- Point out visuals that are unnecessary or instances of wordiness.
- Be on the lookout for the dreaded typos.
As I mentioned above, the quality of your documentation directly correlates to the quality of your end product. If you have created a step-by-step instructional document and included all the necessary steps, it stands to reason that the task will be completed thoroughly. If you have created an org chart with all the necessary players, there is no reason why an inquiry should be left unanswered. It is important to solicit feedback from relevant stakeholders who are not afraid to punch holes in what you have created.
DO: Revisit (and Update) Your Documentation Often
Change happens. People leave companies, and new people come in. Websites are updated. Processes are refined. As such, it is important to revisit your documentation often to make any necessary updates. As mentioned previously, you may need to replace a dead link or update a visual based on a new website. But more importantly, workflows can and SHOULD change. Successful teams (and leaders) are always be on the lookout for a better, more efficient way to handle a given task. And once you discover it, update your documentation accordingly. The goal of documentation is to create efficiencies, so you want to make sure your workflow or process that you are documenting is the most efficient.
DO: Plan for the Future
As you are generating (or updating) your documentation, keep your why close by. You are investing time to create this documentation upfront to create efficiencies in the future. You will save yourself the time of having to provide frequent one-on-one training. Creating documentation won’t eliminate the need for all training (nothing can replace direct time spent training your team) but should eliminate SOME time spent. You will also be creating efficiencies for your staff. Remember that they most likely have full workloads and creating relevant documentation will make some of their day-to-day tasks less time consuming. And finally, if your documentation is accurate and thorough, it stands to reason that your end product will be accurate and thorough as well, reducing the opportunity for error and potential escalation. So, although the creation of proper documentation is time intensive, it should save you time and grief down the road.
Interested in learning more about how the Lumina team can streamline your workflows or want to talk to the author of this post? We want to hear from you! Email the Lumina team or learn more about Lumina Datamatics.

0 Comments